The purpose of this blog is to show and track the progress of my KTM 525 Adventure Bike Project.
I became interested in building a "Dirt Adventure Bike" after coming across this website: http://www.motorcyclejazz.com/. This is a very informative site that Martin Hackworth has put together and obviously spent a great deal of time and effort providing information regarding his adventure rides he calls The Tour of Idaho. He currently has two rides on his website a T1 and T2. The T1 ride is from the southern to northern border of Idaho and T2 is from the western to eastern boarder of Idaho. The priority for these two rides is; 1-single track, 2-atv trail, 3-non-maintained road, 4-gravel road, and 5-paved road. Both rides consist of less than 10% on pavement.
Since I live in Idaho Falls, ID these rides are right in my back yard. I have ridden dirt bikes for most of my life and currently own a 2009 KTM 300 XC. But, the 300 is a 2-stroke which requires mixing fuel and I did not want to deal with this issue on these types of rides. I will save that challenge for another time after I complete these rides on a 4-stroke.
Why did I decide on a KTM 525 EXC?
Here is a list of criteria I wanted for building a "Dirt Adventure Bike":
1. 4-stroke - so I didn't have to mix fuel
2. Geared for tight trails but yet cruse on open dirt roads - 6 speed transmission
3. Reliable - for peace of mind when over 100 miles from any means of help
4. Plenty of power - haul extra fuel, gear, and etc.
5. Excellent suspension - want a comfortable ride but still ride aggressive
5. Excellent suspension - want a comfortable ride but still ride aggressive
6. Accessory compliant - easy to obtain large tank, racks, protection, lights, etc.
7. Easy to work on - if trouble does arise and require hauling fewer tools
8. Licensable - need to license for those road stretches between trails
9. Long range - greater than 200 mile range between fuel (accessory tank)
10.Most of all FUN TO RIDE!
As you can see the bike is in excellent condition. I would have guessed less than 500 miles from the looks of it. I am actually the third owner. I was told the first owner was height impaired so he didn't take it off road much. And, the second owner decided he wanted something more for paved roads and less for dirt. He had a brand new BMW F 800 GS parked in his garage. I would have to say the KTM looked a whole lot better after I got it home and away from the new BMW.
Since owning this bike I have put about 250 additional miles on it. I have enjoyed riding it a bit and am looking forward to this project. Winter has arrived here in Idaho and so the project begins.
The rest of this blog is dedicated to the chronological progress of building this bike into a "Dirt Adventure Bike".
My Project Location
I picked a corner in the basement to begin this project.First step was to desmog the bike. The above pictures shows the items removed following the canisterectomy proceedure found on KTMTalk.com.
I then tore the bike down basically to the engine and frame
Next I put in the new Trail Tech Stator in the HT Oil cooler.Close up of both stators. Trail Tech is on the left. The DC conversion will also be implemented which will be used to power a Trail Tech 8" HID headlight along with GPS, SPOT, and other dashboard devices that I may install. I haven't yet decided on which battery I am going to use but will post which one I choose when I get to that point.
With the HT Oil Cooler the oil capacity is almost 2 quarts. Standard oil capacity is 1.3 quarts of oil.
HT Oil Cooler and Trail Tech stator installed. The line on the bottom right of the cooler is the intake and the line on top feeds to top of engine. I consider this a must for extended traveling. One of the drawbacks to the KTM RFS engine for Adventure type riding is the small oil capacity (1.3 quarts). Keeping the oil clean, cool and at the proper level is very important to a long lasting engine. Increasing the oil capacity to almost 2 quarts should help keep it cooler and keep it from breaking down as quick. I will also run a good synthetic to help with the distance between changes.
I put on Silicone carburetor hoses to freshen up the stock lines that become very stiff over time. They also give the bike a nice clean look.
I had a stabilizer from a previous KTM that I was not using that would fit this bike so while I had the bike torn down to this point I installed the stabilizer.
This is the RTT Stabilizer that is integrated with the top triple clamp. I prefer riding with stabilizers and all my bikes have them. I have used Scotts, GPR, RTT, and Ohlins and can't really say I have a preference as they all perform well and do the job they were designed for. One nice thing about the RTT is it is integrated within the top triple clamp making it a very sleek application. It also have a Remote Adjustment Valve to increase, maintain, or bypass steering resistance on the fly. It has been a great unit and I have never had any leaking issues with it.
I also have some Fastway footpegs from a previous KTM that I will install. These pegs are wider offering more support should be more comfortable on those long rides. They also work great when riding in a softer sole boot.
The next thing I did was to remove the Chain Guard and replace the orginal which was bent. I ordered a Primary Drive Chain Guide from Rocky Mountain MC because I have been pleased with Primary Drive products. But I will be replacing this Chain Guide before any off road rides because it is not 100% plastic. The sides are aluminum and subject to being bent. I will probably go with the TM Designs.
While I had the bike down to this point I lubed the swing arm bearing and shock bushing.
Next I installed the Pro Race Designs Drain Plug Kit. This may look like a bling item but I chose this option to eliminate any issues with drain plugs striping or breaking. I had read about this issue on KTMTalk.com and did not want to have it happen when changing the oil away from home.
Now I put the skit plate back on. I had previously purchased a quick release Skid Plate because it offers excellent coverage, is quite, and easy to take off and put back on without tools. This is a KTM Hard Parts item.
Next I installed larger Radiators. Since the 525 can easily overheat in slow technical sections I wanted to help eliminate this issue in some way. I purchased a fan and thermostat and was going to install this but found larger radiators built by Warp9 (http://www.warp9racing.com/). Since I was purchasing these radiators I went a head and purchased my first bling item. Cool looking orange silicone radiator hoses. Don't they look cool. I have quite a few pictures of this modification because I wanted to show the difference in size and where the additional capacity is gained. I have already checked to see if my tank will mount up with these radiators and it looks just fine. I did have to cut a little bit off a few of the hoses to get the fit I desired. I would much rather had to cut than have a hose to short. I fitted everything prior to tightening all the clamps.
I have everything wired up and actually verified bike would start and run. But as you can see the wiring is a mess and needs cleaned up some.
This is what a bunch of zip ties can do.
Know I am ready to work on mounting the tank.
I needed to build tank mounts because both tanks I purchased (used) did not come with mounts. I would suggest purchasing a new tank with mounts or at least verify you are getting the complete mounting system if puchasing used. I like things to be simple and neat and wanted to do it right. I ended up ordering a bolt (10x160mm) and threading additional threads to I could build the right side mount. I ended up cutting about 1/4 inch off the bolt because I wanted a flush mount behind the pipe. This took quite a bit of time measuring, bending, and putting on and off to get a perfect fit. I am very pleased with the way it turned out.
I about forgot to mention that the Warp 9 Radiators did not have a mount for the horn. I was able to use the standard shroud mount with this tank.
I also cleaned the air filter.
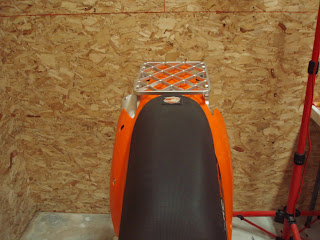
The next big project was the Promoto Billet Rack. This is a very good rack but does take some ability to mount. I spent about 3 to 4 hours mounting this rack. The instructions are great but you end up doing some drilling and cutting the plastic. It turned out great.
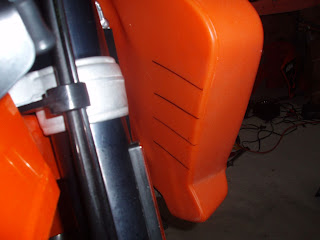
I took the oppertunity to put fuel level marks on the tank. I marked both sides at 1, 2, 3, and 4 gallons. I still need to label the marks and clean it up a bit but it should help with caculating distance and all.
Now I need to work on mounting the front light and building the dashboard
This project has slowed down a bit because I did not have room on the handle bar for the RTT stabilizer remote valve switch. I have sent my Stab back to RTT to install the bypass unit elimiting the remote handle bar switch. Currently I am in wait mode.
UPDATE: After almost 2 months I have everything ready to continue. I sent my RTT stabilizer back and had a bypass installed to eliminate the remote valve switch. And, I decided to have my suspension done. I purchased some used forks that were 2007 with 2009 internal. Basically these forks converted from open chamber to closed chamber forks. Everything was going pretty well until I went to install them and 3 of the 6 mounting points for the fork protectors were stripped. I contacted the individual whom I purchased them from and he basically said you got what you paid for and to bad so sad. I accepted he was not going to make it right and time to move on. So, I sent the forks back to where they were rebuilt (County Cycle in Wisconsin) and had helix-coils put in. I could have done this myself or locally but I took advantage of sending them because I had County Cycle swap the external fork uppers with mine since mine were in perfect shape and the set I purchased had a lot of anodizing wore off. Long story but now the suspension both front and rear is sprung and valved for my weight and the extra weight of the up to 6.6 gallons and gear that I will carry. I am hoping this will create a much better ride keeping the bike more in the initial stroke of the forks and shock rather than down in the progressive more firm portion of the suspension stroke. With the stabilizer and suspension issues resolved I am back to work on my adventure bike project.
Here is a picture of the front stabilizer without the remote switch along with a picture of the new front forks. I know the forks look the same as they did before.
Time to mount the headlight and see what I need to do for all the electrical.
I have run into another issue.... There is not enough room behind the light to mount the electrical connection block in the same location off the top triple clamp. This picture shows how tight the room is between the back of the light and the top triple clamp.
And this is the wiring system I need to fit behind the light. There will be other wires and connectors as well. I have a Trail Tech computer system to install, the stock key switch, heated grips, and a navigations (GPS) system. This is going to be a bit of a challenge as I like things securely mounted and nice and neat.
After accessing the situation I need to build a bracket to mount the electrical panel about a half an inch or so higher. KTM does not have much extra wiring length to work with either. Off to the drawing board.
I ended up having to build a bracket to mount the electrical panel higher because the back of the light was hitting it. It is a very tight fit with the panel, the connections and all the wiring. This took some engineering but I am happy with the results. Below is a picture of the bracket including a couple that show the mounted bracket which raised the wiring connection panel about 3/4 an inch.
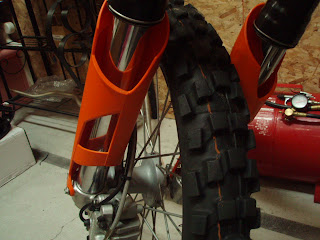
One thing I did while working on the front end was replace the fork guards with KTM's latest wrap around type. As you can see in the picture they offer more protection and are much stronger.
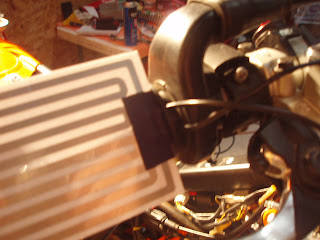
I also added heated grips. I purchased the Tusk brand from http://www.rockymountainatvmc.com/. In doing research on these I found that the throttle side runs hotter because of the grip being thinner and the throttle tube insulating the element and the bar. So, I picked up some heat shrink tape and wrapped the bar on the clutch before installing the grip. I installed the clutch side grip and did not like the bulk. To install this grip compress air is used from the throttle bar end to expand the grip. Since I did not like the bulk I tried installing a throttle side on the clutch side and this worked out great. I am hoping the heat from low to high will be more even between each. I also drilled some small holes in the throttle tube inside collar to run the wires through. The wires are the most fragile part so I put JB Weld around just prior to slipping on the grips. The epoxy hardened to create a protector for the connection between the wires and element. Here are some pictures of the work in progress.
Now here is something that I am quite proud of, it is a key operated fuse panel. I wanted a fuse panel for wiring accessory items. I picked up a 6 port fuse panel at Autozone and a relay at Radio Shack. The relay's job is to provide power to the fuse panel only when the key is turned on. Thus any item being powered by the fuse panel will loose power when the key is turned off. The relay is mounted to the top of the fuse panel and covers one of the fuse ports. Since the one is covered I only have 5 avaliable fuse ports which I think is plenty. Currently I plan on connecting the grip warmers and the front light to this fuse panel.
Since I will have other items that I want constant power to I built two posts on the panel using two of the mounting holes. These connect directly to the battery with one is a positive and the other negative. For items I want constant power to I will connect to these posts so I don't have multiple wires connecting directly to the battery terminals. I installed an inline fuse from the batter to one of the posts so I something shorts between this constant power it will blow the inline fuse. Currently I will connect the Trial Tech Computer (Striker) and the GPS to constant power.
I mounted this in the air box using the rubber battery holders to hold in place. When I am complete I may use some silicone to adhere the panel to the battery to make it a little more secure.
Here is a picture of the fuse panel with the relay and battery posts all wired. I don't have any connections to it yet but it all checks out with the tester light and is ready to connect too.
Here is a picture of my dash board with the light mounted. I still have some other items to add like a GPS, LED light and HID flood light. These have been ordered from Trail Tech.
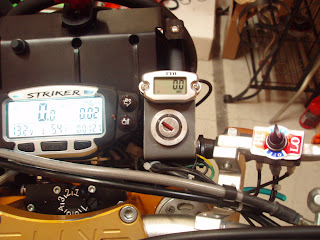
A close up of the Trail Tech Striker computer, TTO tach and hour meter, and key switch.
I took it out for its first ride last week since it went down in the basement for winter mods.
The ride went really well. I put about 50 dirt miles on it. Before going back to the basement for some additional work I stopped by Pocatello Power Sports and had Chris through it on the dyno.
Chris recommended changing the bowl, accelerator pump, leak jet, and needle. I did this while still connected to the dyno.
The below graph represents a before and after. We didn't hold the throttle wide open to test peak HP because that was not was I was after. The blue lines represent the initial test while the red represent the result of rear wheel horse power and torque. As you can see there is about a 5 hp gain in the midrange but even better is the torque curve of which climbs quickly and holds throughout the throttle range. I am very pleased with the results as the bike feels even smother now.
This is the current state of my project. Additional information will be posted as I complete each option of the project.


